What's new

Reiko normals tier list

DDutchguy

Stand 4'ing airplanes out of the sky
Pssh, look at these plebs over on Twitter and /r/Mortalkombat arguing over whether Kenshi, Baraka, Johnny or Raiden is the most broken.

Time for a REAL tier list
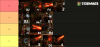
21169

S-tier
  • B3: Incredible whiff punisher, you've got like 30 frames to hit confirm it into up-knee for a combo, combos into Darrius'spinning attack from all but the absolute tip for free chip or 16%... Curious if any Reiko player would disagree with this.
  • Standing 3: Shoots Jumbo Jets out of the sky with how good of an anti-air it is, 12 startup frames and good horizontal range makes it a great punisher, and it's your best mid-combo button. Downside is I find it pretty hard to convert off of once you anti-air with it.
  • Standing 4: A slightly worse anti-air than standing 3, but hits birds just fine AND combos consistently into up-knee. Nets you ~17% meterless off of an easy combo, but much more if you use bar or a Darrius kameo.

A-tier

  • F2: OVERHEAD, safe, great pushback on block, -6 so completely safe, compliments his strike-throw and B2 game... Yeah this is barely not-S-tier, B3, standing 3 and standing 4 just stand out the tiniest bit more.
  • F1: Hits mid which is always glorious, decent range, haven't run into any low profiling issues yet, and works perfect as a strike-throw mix with command grab. Downsides for me are the 16-frame startup (not slow but not fast either), plus I feel like I have few options once someone blocks it: it feels like giving up my turn.
  • D4: Only a hair shorter than B3 which is pretty sweet, 10-frame startup, great pushback on block, it's all you need bros. Downside is that +15 hit means it doesn't quite jail into F1. Probably deliberately so people can still armor through (which does give us options for baiting that armor out).
  • D2: Surprisingly consistent anti-air, even compared to standing 3 and 4. Also lets you hit above you where standing 3 and 4 would whiff. Downside is the crappy horizontal range, but if you only use it as an anti-air you won't notice.
B-tier
  • B2: May be underrating this move. +8 on block is greaaaat for strike-throw mixing with F1 and command grab, splat gives you instant oki, doesn't recover that slowly at 22 frames. Downside is getting poked out of it. I hardly use this move tbh, how about y'all?
  • B4: Gives a low to mix up with F2, +3 on block with great pushback, putting you in range for B3 shenanigans. Nothing much to say outside of that though.
  • Standing 2: Decent punisher as a 9-frame high, slightly more range than standing 1 and leads to easy hit confirms. 21 pressure is also neat with it being +2 on block.
  • F4: Great poke in neutral, hits mid, seems hard to low profile and puts the opponent nearly fullscreen. Downside is it being -14 on block, so I'm not sure if the move is actually decent or it's more of a gimmick. Let me know if y'all have more experience with F4.
  • D3: Hardly use it, had to place it somewhere. @Reiko-community please expose me if this turns out to be a mega good poke.
  • D1: Could be lowballing this one, it just seems like a generic D1 to me.

C-tier

  • Standing 1: As a normal it's your generic 7-frame jab, but with its awful range it can be unreliable for punishing. Pressure with the 12 string is fine and it may be easier to jail off of a poke, but I feel like you could also just be using 21. I may be underestimating this as an anti-air though.
Post your own lists below
 

DDutchguy

Stand 4'ing airplanes out of the sky
@Reiko players: What do you guys think of my placement of B2, F4 and D1/D3? Those were the ones I was least sure about.
 
21173
S-Tier
B2- Plus 8. Essentially your turn still.
F2- Hard overhead knock down. Safe on block. Easy follow up pressure.
F4- Need to zone? Hit them with this and send them full screen. Longest reaching normal.
2- Good stagger tool.

A-Tier
D3- Clips opponent from blocking high all the time. Zero push back on hit means you can go for grab, overhead, or b2 pressure.
D4- Good spacing tool to check people in neutral.
D1- Similar to D3 only that it has slightly better frame advantage but opponent can stand block it.

B-Tier
F1- 16 frame mid. Not as good as it seems. Gets clip by D1's. Only useful for meaty.
B3- Overrated despite having good range. It's 15 frames and will get check by pokes if not spaced properly. Only good for whiff punishing. Cannot safety hit confirm into knee. Death on block. Death on block knee. Death on cancel run. If someone jumps at you while you did this, your basically dead as it has a long recovery.
B4- Plus 3 on block but range is short. Has limited use.

C-Tier
1- Good for anti-air but crap range. Is plus on block, but what good is it for if it whiffs 95% of the time. You need to be touching the opponent for it to connect.
3- Good anti-air but will get beat out by some normals. Only move that is fast enough to punish strings that are like -10 that gives push back. His T-Rex arms won't reach, so use this instead.
D2- Nothing bad about it. But if you want to anti-air you have better options that will lead to better damage.
4- Good anti-air. Better than 3 in some anti-ait cases because you can cancel into a delay knee for a combo.

A through C tiers are usually the buttons I normally throw out in terms of frequency. S-Tiers are the buttons that can/will lead to some juicy setups and pressure.
 

kantboy2

Pale Rider
F4 feels like a special move if you can read opponents mid screen.

Shurikens all day, wait for it ... F4; rinse and repeat.
 

DDutchguy

Stand 4'ing airplanes out of the sky
View attachment 21173
S-Tier
B2- Plus 8. Essentially your turn still.
F2- Hard overhead knock down. Safe on block. Easy follow up pressure.
F4- Need to zone? Hit them with this and send them full screen. Longest reaching normal.
2- Good stagger tool.

A-Tier
D3- Clips opponent from blocking high all the time. Zero push back on hit means you can go for grab, overhead, or b2 pressure.
D4- Good spacing tool to check people in neutral.
D1- Similar to D3 only that it has slightly better frame advantage but opponent can stand block it.

B-Tier
F1- 16 frame mid. Not as good as it seems. Gets clip by D1's. Only useful for meaty.
B3- Overrated despite having good range. It's 15 frames and will get check by pokes if not spaced properly. Only good for whiff punishing. Cannot safety hit confirm into knee. Death on block. Death on block knee. Death on cancel run. If someone jumps at you while you did this, your basically dead as it has a long recovery.
B4- Plus 3 on block but range is short. Has limited use.

C-Tier
1- Good for anti-air but crap range. Is plus on block, but what good is it for if it whiffs 95% of the time. You need to be touching the opponent for it to connect.
3- Good anti-air but will get beat out by some normals. Only move that is fast enough to punish strings that are like -10 that gives push back. His T-Rex arms won't reach, so use this instead.
D2- Nothing bad about it. But if you want to anti-air you have better options that will lead to better damage.
4- Good anti-air. Better than 3 in some anti-ait cases because you can cancel into a delay knee for a combo.

A through C tiers are usually the buttons I normally throw out in terms of frequency. S-Tiers are the buttons that can/will lead to some juicy setups and pressure.
Interesting, very different approach to my own list. Yours is more focused on 'does this normal give me the pressure/juice I'm looking for' right?
 

DDutchguy

Stand 4'ing airplanes out of the sky
F4 feels like a special move if you can read opponents mid screen.

Shurikens all day, wait for it ... F4; rinse and repeat.
Maybe I was lowballing F4 yeah, it just always felt a bit gimmicky to me to stick out a -14 button in neutral.