What's new

Move List - Mileena Mileena Frame Data Chart

Akromaniac27

Ready to lose your head?
****For the frame data, this is TO THE TEETH. So like something there that says -8 for example, CANNOT be punished by anything that is 8f or slower, you know, like how actual frame data is SUPPOSED to work. Same with something that's +1 for example, if you use an 11f move next, making it 10f till impact now, nothing 11f or slower will beat it. These were done against reversals so here's the tip to make it easier to understand:

If it's a
NON-REVERSAL that the opponent is using when you're plus on block, add an additional frame to your advantage (+1 becomes +2). For a NON-REVERSAL used by the opponent when you're negative on block, take away a frame of disadvantage (like -4 becomes -3).***

***For CANCEL ADVANTAGE, the numbers below show how much advantage you have on HIT for it to CONNECT, and for BLOCK, on which frame for it to leave you neutral***

Dash forward - 21f total duration

Backdash - 34f total duration

6f after a jump until you can input a special or normal


@TheGabStandard
@EMPEROR_SunFire
@ZeroEffect
@YOMI RM SaltFace
@Baconlord
@Ninjaguy446
@Damaja325
@JerzeyReign
@Johnny San
@Mr. Mileena
@Yoaks
@xWildx
@Method
@Crimea
@YoloRoll1stHit
@MyronJ
@Nu-Skoool
@Endding
@Purplerain
 
Last edited:

1man3letters

Alpha Tarkatan - Moderator
Moderator
nice! miss about mk9 times how every characters frame data was in each characters thread. easier to consume/remember it all that way imo.
that mk frame data site is really poorly laid out, when your done ill sticky this.

also roll is def 8 frames, any forward advancing move has travel time
 

Jolt

Uprise
This is absolutely awesome. Good work! At point blank, roll is in fact 8f. Any further than that though and like 1man3letters said, it has travel time. @Akromaniac27 if I ever start playing other characters, I'm going to need you to learn those too lol. Excellent start on our resources!
 

YoloRoll1stHit

Publicly Educated
Yea the link Braindead shared is the compilation of all chars' frame data. It has some small mistakes though. You guys didn't know about that?
 
SHOULD be getting the game this friday, and I wasn't sure whether to add this to whichever related thread there was to this (to admins/mods), but I started on this in the meantime. ACCURATE, not NRS, frame data, is what will be my main and first focus once I get the game since they can't be relied upon to deliver even that.

*A huge thanks to @BloodBurger thread on her movelist and video (which btw, THANKS for recording in HD because I was able to check some frame data off of it). But after it I realized I missed like 2 strings(extenders) from the spreadsheet.
Did I miss something? Where are the frames?
 

Akromaniac27

Ready to lose your head?
Did I miss something? Where are the frames?
I was gonna wait till I could check it all (like for the strings because I know from the past, most were usually pretty off), but I can add them in.

As for roll, that's good that it hits on the 8th frame. It genuinely didn't look like it would since she wasn't that far at all really from the opponent and was gaining several frames
 
By this weekend it should be done. Long story short, I thought my capture device was being faulty so I tried to fix it all this time even though despite it fucking up my TV screen only when its plugged in, I could still record just fine -___-
Those are the pre-patch frames, just so you know. Now she has,
1 = 11f
2 = 8f
4 = 11f
D1 = 9f
B2 = 13f (Non-Piercing)
 

Akromaniac27

Ready to lose your head?
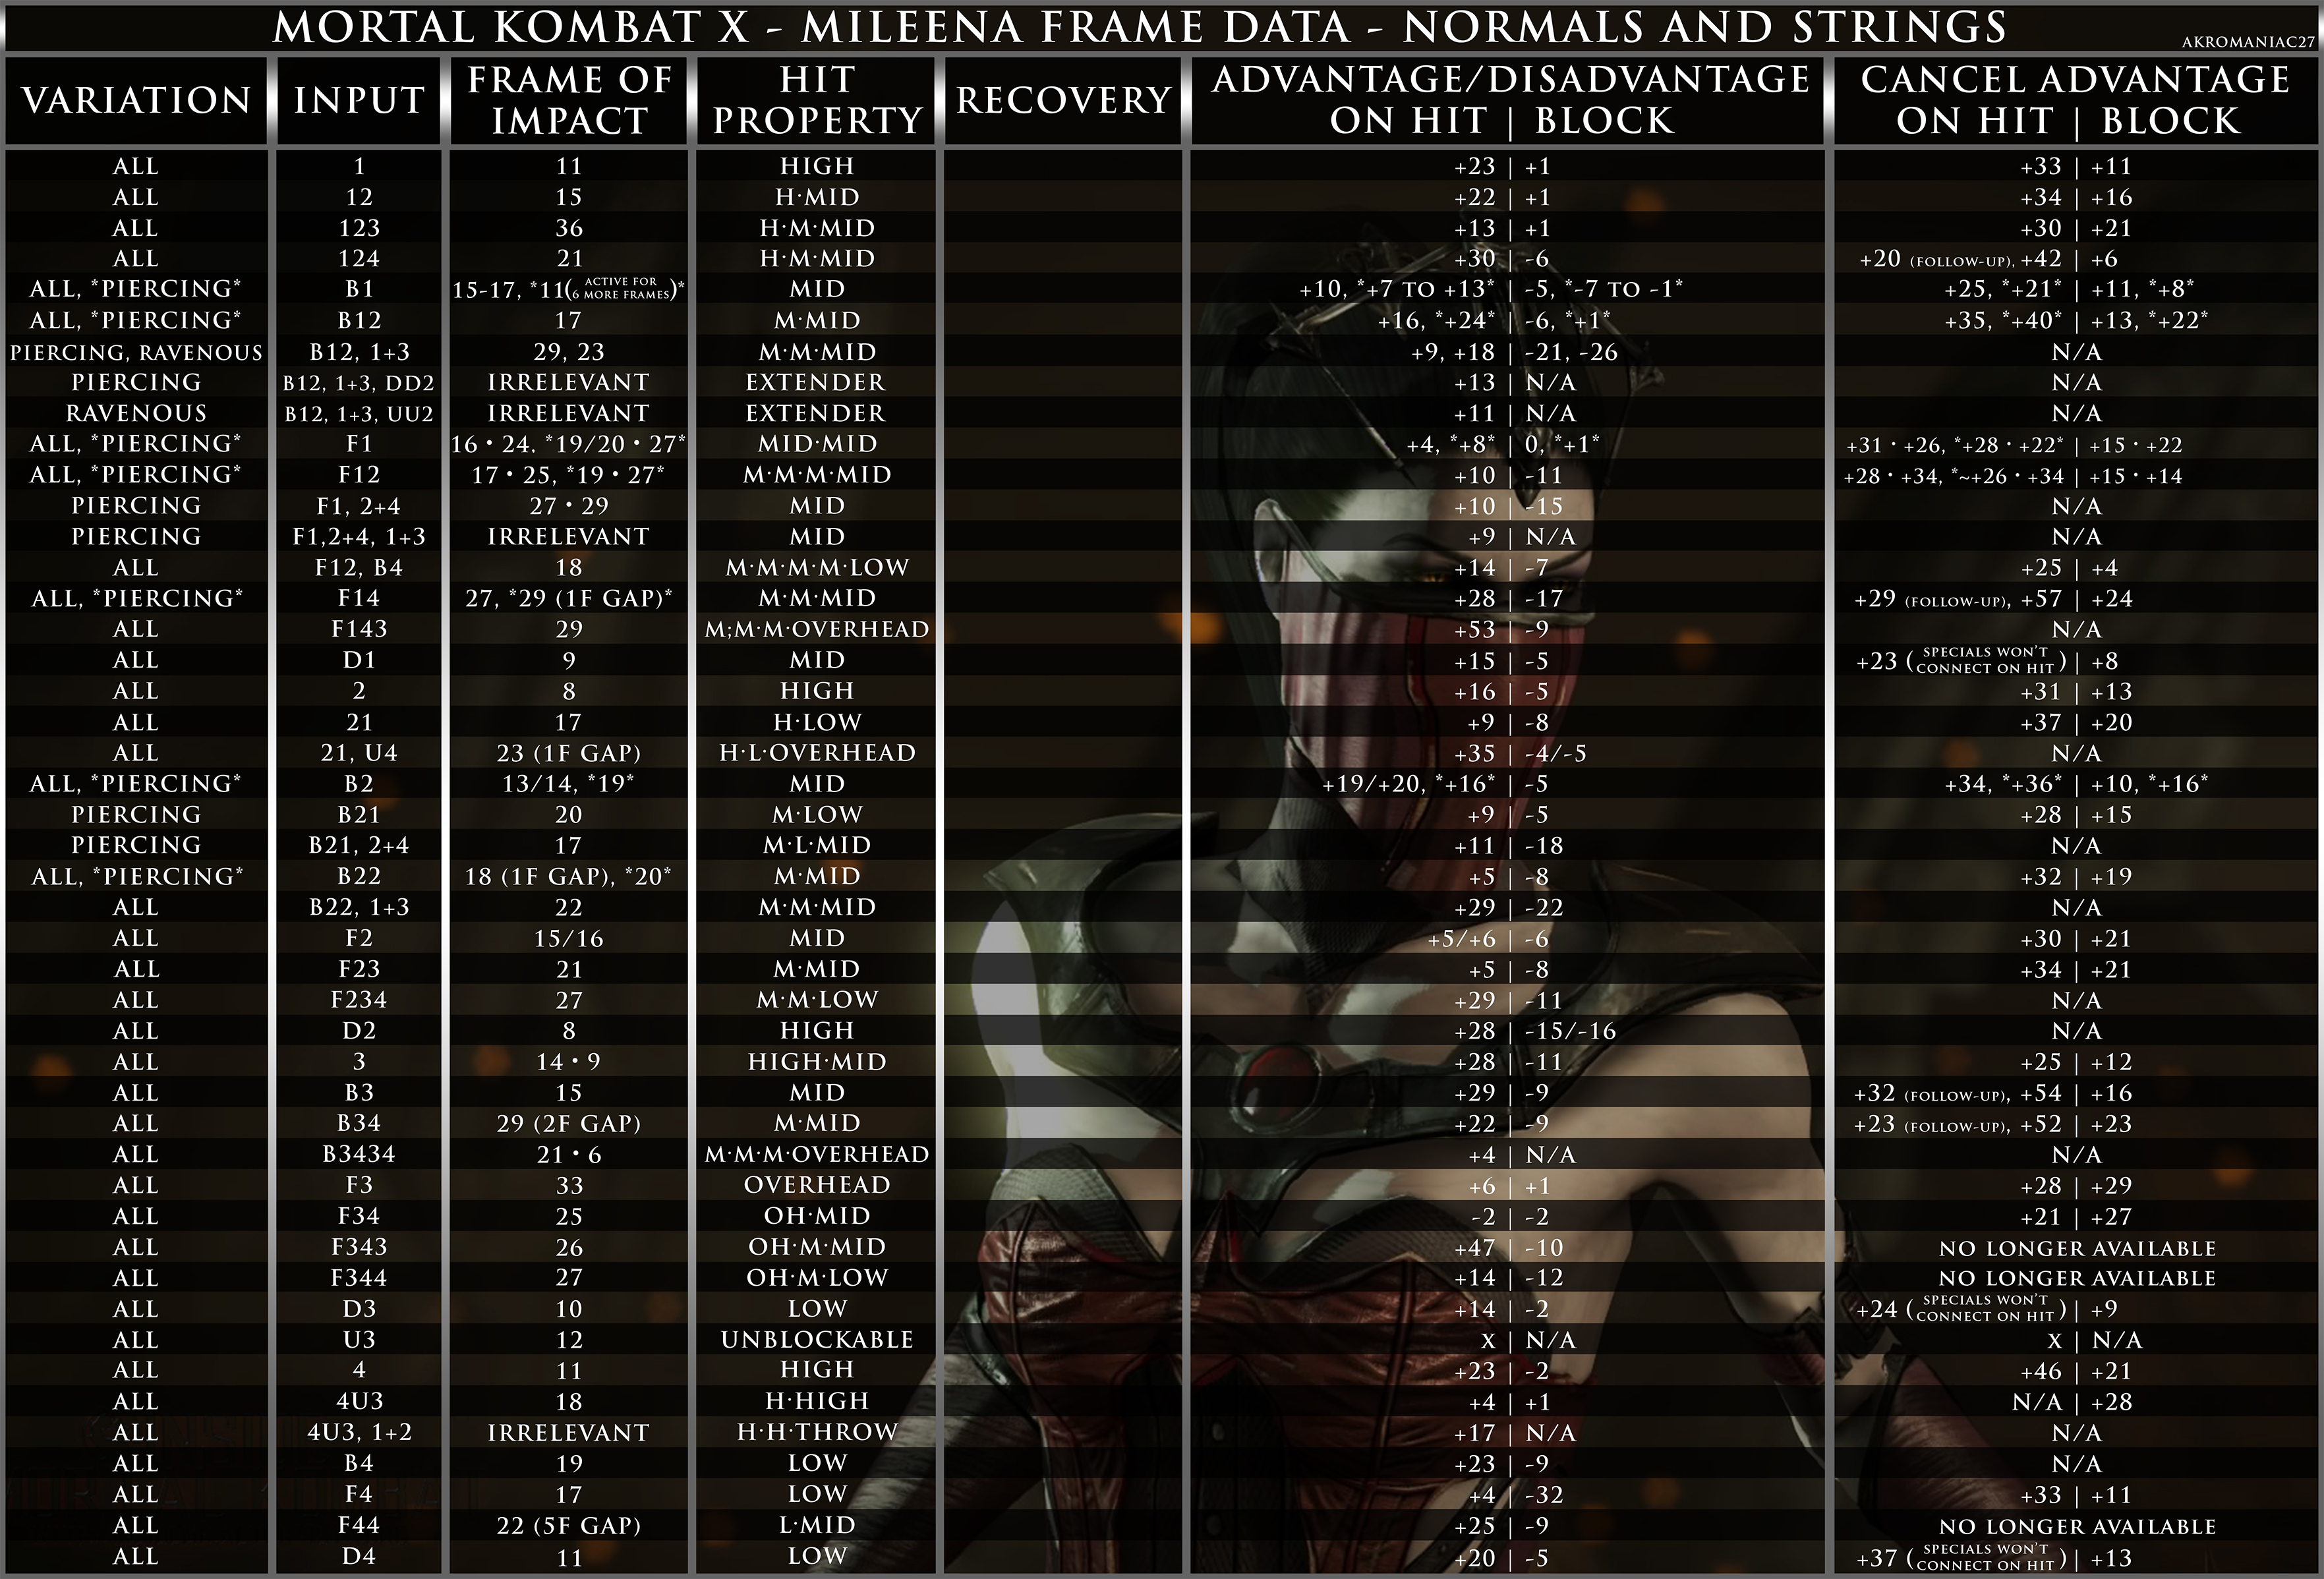
So it's ALMOST entirely done....but most of the important stuff is there(U3 aside, but meh). I wasn't REALLY gonna cover recovery, but I figured I might as well lol.

****For the frame data, this is TO THE TEETH. So like something there that says -8 for example, CANNOT be punished by anything that is 8f or slower, you know, like how actual frame data is SUPPOSED to work. Same with something that's +1 for example, if you use an 11f move next, making it 10f till impact now, nothing 11f or slower will beat it. These were done against reversals so here's the tip to make it easier to understand:

If it's a normal that the opponent is using when you're plus, add an additional frame to your advantage (+1 becomes +2). For a normal used by the opponent when you're negative, take away a frame of disadvantage (like -4 becomes -3).***


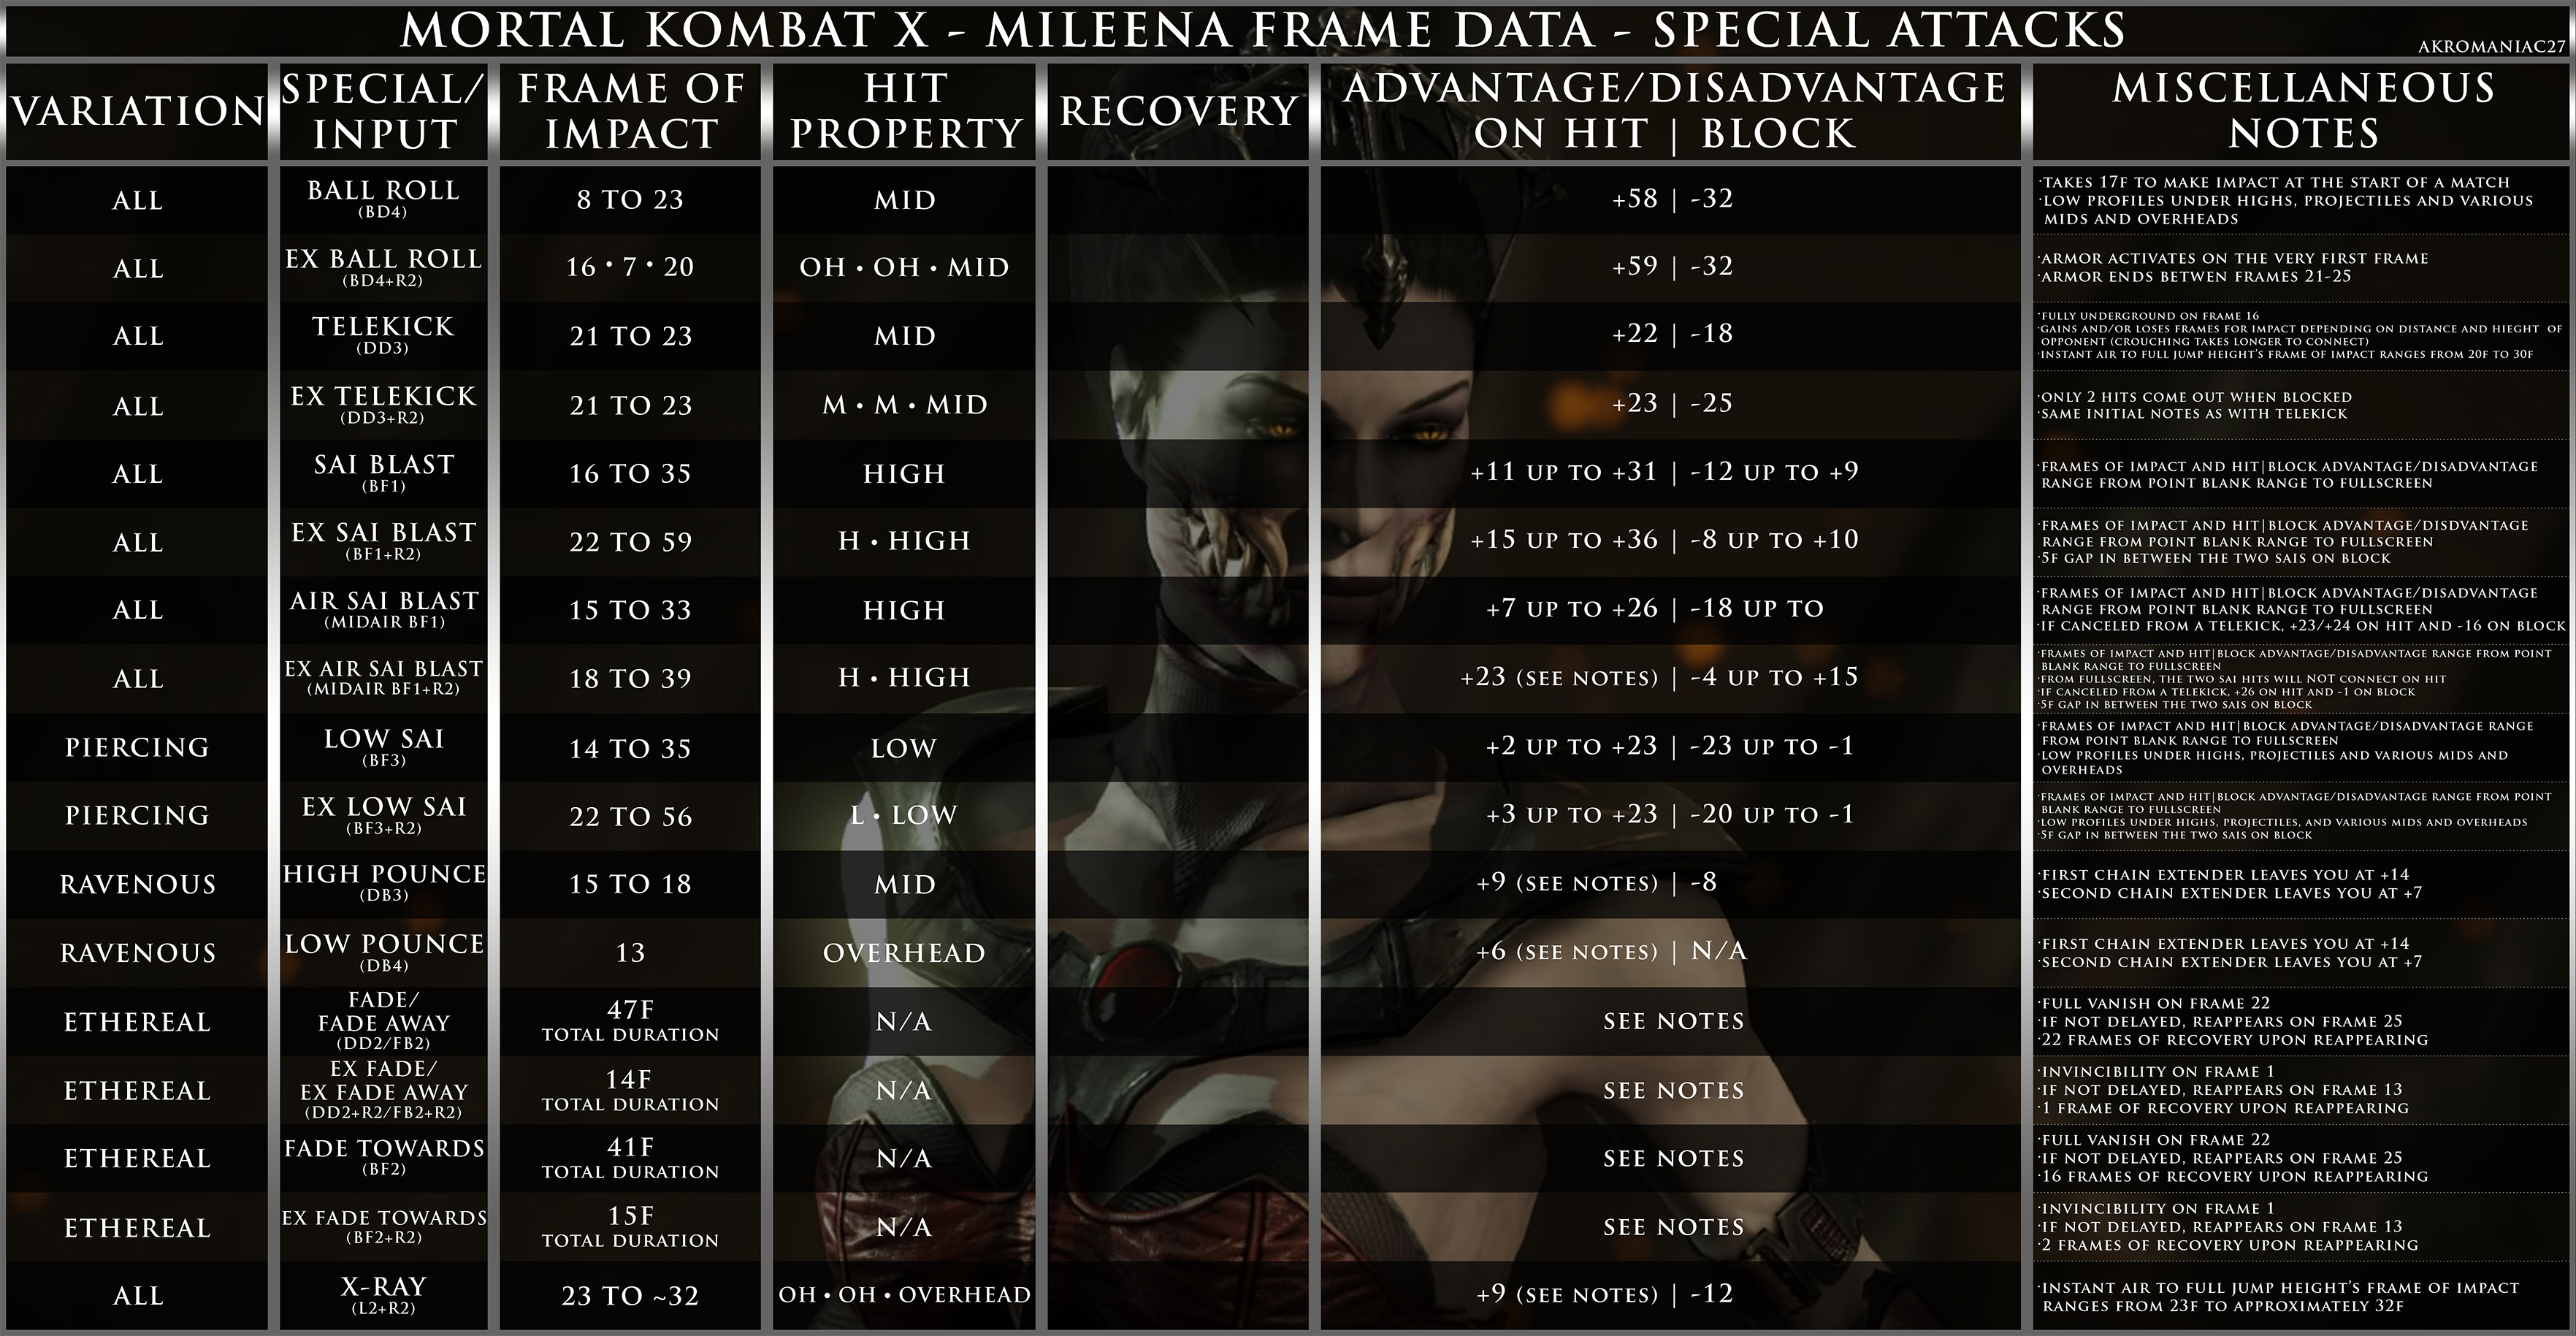
As for the specials, their info is finished as well, I just have to revise the chart's layout for it, but in the meantime, I'll post below what I have for them:

*6f after a jump until you can input a special or normal

Low Pounce(the overhead grab):
13f till impact - +6 on hit and roughly 27f of recovery
BB1 followup - +14 on hit
DD2 followup - +7 on hit

The Mid grab in Ravenous:
15-18f till impact - +9 on hit and -8 on block
DD2 followup - +14 on hit
FF4 followup - +7 on hit

Sais:
16f till impact up close; 35f from fullscreen
+11 on hit point blank; +31 from fullscreen
-12 on block point blank; +9 on block from fullscreen

EXSais:
22f till 2nd sai comes out at point blank range, 5f gap; 2nd Sai hits on the 59th frame from full screen
+15 on hit point blank; +36 from fullscreen
-8 on block point blank; +10 on block from fullscreen

Low Sais:
14f till impact up close; 35f from fullscreen; 5f gap
+2 on hit point blank; +23 on hit from fullscreen
-23 on block point blank (seriously WTF); -1 on block from fullscreen

EXLow Sais:
22f till 2nd sai up close; 56f for 2nd sai to hit from fullscreen; 5f gap
+3 on hit point blank; +23 on hit from fullscreen
-20 on block point blank (seriously WTF, again); -1 on block from fullscreen

Air Sais (I used instant airs for this data):
15f till impact point blank; 33f from fullscreen
+7 on hit point blank; +26 on hit from fullscreen
-18 on block point blank; *need to check from full screen*

EXAir Sais (used IA's for these too):
18f till 2nd sai comes out; 39f till impact of 2nd sai from fullscreen; 5f gap
+23 on hit point blank; for fullscreen, its tricky to check this because the 2nd sai doesn't connect with the first one (good shit NRS)
-4 on block point blank; +15 on block from fullscreen

Telekick~air sai:
15f for sai to connect
+23 to +24 on hit
-16 on block

Telekick~EXair sais:
20f till 2nd sai connects; 5f gap STILL
+26 on hit
-1 on block

Telekick:
21-23f till impact. Varies by range and also the hitbox of the opponent -______- like it legit takes longer if they're crouching
By frame 13, only her hair sticks out but she can get knocked out until frame 16, I mean, naturally, cuz why not
+22 on hit and -18 on block

EXTelekick:
Same as above pretty much except she's +23 on hit with a shitty inconsistent follow up option, and -25 on block. YUP...even more negative than her regular version

Air Tele(I used instant airs for this too):
20 to 30f till impact depending on height; 20f being the IA and 30 from full jump height
On hit and block, same as regular Telekick

EXAir Tele:
Basically the same exact thing as Air Tele's first part and the remainder just like EXtelekick's

Ball Roll:
8f till impact up close; max range I was able to get to 23f; at the start of a match, it takes 17f to make impact if they don't move backward
like 20-25 frames of fucking recovery(I still am breaking this down cuz inconsistent NRS loves screwing with Mileena)
+58 on hit and -32 on block

EXRoll:
16f till impact, 7f till second hit, 20f till 3rd hit (I haven't fully checked how long armor lasts but it does start on the very first frame)
+59 on hit and -32 on block

Fade:
She fully vanishes(can't get hit) on the 22nd frame; if not held down, she'll always reappear on the 25th frame. Below shows the full duration until you can move again after inputting the move.
Fade in place - 47f total duration
Fade forward - 41f total duration
Fade backward - 47f total duration

EXFade:
Invincible from frame 1, she reappears on frame 13 and below is the total duration for each.
Fade in place - 14f total duration
Fade forward - 15f total duration
Fade backward - 14f total duration

XRAY:
28 slow ass frames till impact
+9 on hit(but too far to do anything) and -12 on block

Air XRAY:
the fastest I got it was 23f but it can take up to 31 fucking frames till impact, this also applies to the grounded XRAY
-9 on hit and -12 on block too

Dash forward - 21f total duration
Backdash - 34f total duration
 
Last edited:

Akromaniac27

Ready to lose your head?
So like one or 2 knockdowns aside(to double check), armor duration on EXroll, and U3 on hit crap is all that's really left. Recovery will take a few days most likely because its weird, but if you use Mileena, you already know she's like the ONLY character in this damn game that actually DOES have whiff recovery and can get punished for it.

But the specials portion is up and I'll post back here as soon as all that is listed is finished.

@1man3letters
@TheGabStandard
@EMPEROR_SunFire
@Ns_Brutalmileena
@ZeroEffect
@MyronJ (I forgot then remembered, forgot and remembered again, and once more for the Sonya stuff.....I have it recorded now though so I just need to check it later)
 

JDE

Pick up & kill it & kill it & kill it!
Nice. I'm just going to post the threads made into the guide so that it have all the info at people's fingertips
 

Jolt

Uprise
So like one or 2 knockdowns aside(to double check), armor duration on EXroll, and U3 on hit crap is all that's really left. Recovery will take a few days most likely because its weird, but if you use Mileena, you already know she's like the ONLY character in this damn game that actually DOES have whiff recovery and can get punished for it.

But the specials portion is up and I'll post back here as soon as all that is listed is finished.
Her recovery is ridiculous. I see many other characters use their specials as movement tools, one to note is Cassie's glowkick. She can do that and whiff it with very little recovery. I suppose the argument could be made that the glowkick isn't a launcher, but ehhh. Don't even get me started on Reptile lol
 

Akromaniac27

Ready to lose your head?
Her recovery is ridiculous. I see many other characters use their specials as movement tools, one to note is Cassie's glowkick. She can do that and whiff it with very little recovery. I suppose the argument could be made that the glowkick isn't a launcher, but ehhh. Don't even get me started on Reptile lol
Exactly. I use Mils roll when I can for movement, much like how it was in MK9, but her recovery is devoid of ALL reason. Like Why is she getting punished for being arguably THE most honest character?
 
Exactly. I use Mils roll when I can for movement, much like how it was in MK9, but her recovery is devoid of ALL reason. Like Why is she getting punished for being arguably THE most honest character?
I dunno, I rarely get punished for empty roll. Or at least I have time to armor through their late response. I admit I don't do empty roll alot like I did in MK9. But in Mk9 you had setups for empty roll, so there's that.
 

Akromaniac27

Ready to lose your head?
*Minor add, armor on EX roll is active until somewhere between 21-25f after its startup. Still trying to record a move for impact in between these frames because by frame 26, she can get hit and on frame 20, she still has armor.
*EX low sai also has a 5f gap on fucking block in between the two unsafe AF sais

ALSO, please let me know if the chart is easy/hard to understand/read. Like mainly for the segments with multiple variations in them, what's within the stars (*) are the numbers ONLY for piercing, but if it's still hard to understand, I can change the font color if that helps. If so, what color? Like a mild purple/pink/magenta, or what? Asking for feedback because I know I can read the chart just fine lol, but it isn't just for me to use.


***FOR THE ETHEREAL MAINS***

-Now, if you're using Vanish Forward (EXfade forward), take away 15f and what you're left with is what can connect:
EX: Cancelling from 21 on hit has you at +37; now take away the 15f and you're left with a 22f window for your next move to connect.

-Now, if you're using Vanish (Exfade in place), take away 14f and what you're left with is what can connect:
EX: Cancelling from 123 on hit has you at +30; now take away the 14f and you're left with a 16f window for your next move to connect.

-ON BLOCK, use the above 2 subtractions for whatever you're doing, and what you're left with is what leaves you at neutral, thus jailing. Anything more, even by 1 frame allows the opponent to backdash/armor/etc:
EX: Cancelling from 4u3 on block has you at +28; now take away the 15f (for example) and you're left with a 13f window for your next move to jail them.
 
Last edited:

Akromaniac27

Ready to lose your head?
Fixed the OP (still working on the recovery frames).

BTW, did you know that if either her f3, EXfade, or cancel advantage on hit, if any one of those were just 1 frame faster, she could have been able to connect her f3 after 4~Exfade. Tight, but would've been possible -_____-